{Play} Colorful Ice Cube Painting
September 15, 2011 in All Posts, Play, Toddler Activities
WARNING: This project is not for the faint of art!
If the thought of messes, stains, vibrant color and irrepressible squealing makes you squirm, stop reading here and hurry over to last week’s post on Water Painting, which is a completely fuss- and mess-free project you and your kids will love just as much as this one.
But if you still can’t resist the bright, wet temptation of this activity, try making the ice cubes with watered down watercolors or washable paints. Food coloring is an option, too, but will stain your child’s skin temporarily, while actual paint will wash off (including acrylic paint). To go totally natural and non-toxic, you could also do this activity with intensely pigmented fruits and vegetables, like beets and strawberries.
Materials
- ice cube tray
- acrylic paint (or crushed fruits and vegetables, watercolors, washable paint or food coloring)
- small craft sticks (or old popsicle sticks, wooden ice cream spoons, straws cut in half, chopsticks cut in half)
- paper or other drawing surface
Step 1
Squirt approximately 1 teaspoon of paint into each ice cube opening. More paint equals more vivid and opaque color, while less paint lends a more translucent look.
Step 2
 Fill the rest of each ice cube compartment with water. Stir until thoroughly mixed and let sit for a few minutes.
Step 3
 Freeze the colored cubes. When the ice cubes are halfway frozen, insert a small craft stick or other object that can serve as a handle. It’s perfectly fine to omit the handles - your little one will love holding the colored cubes in his hand to paint, too, and that’s how this activity eventually ends!
Step 4
Paint!
In order to save our deck, I rolled out some brown packing paper from an Amazon shipment we had recently received to make a long canvas. I also laid out pieces of cardstock for Jane to paint.

At first Jane was hesitant to use the ice cubes and wasn’t quite sure what to do with them. I just waited and watched.


When the ice cubes started to melt a bit, Jane discovered that holding the ice cubes over the paper made colorful paint splashes. Then she worked on color mixing to create new hues:

When the ice cubes really started melting and breaking into little clumps, the handprints started (and we all know how much Jane loves making handprints):

After the handprints, we reached the height of the mess and color chaos! Jane decided to paint the ice cube tray itself:

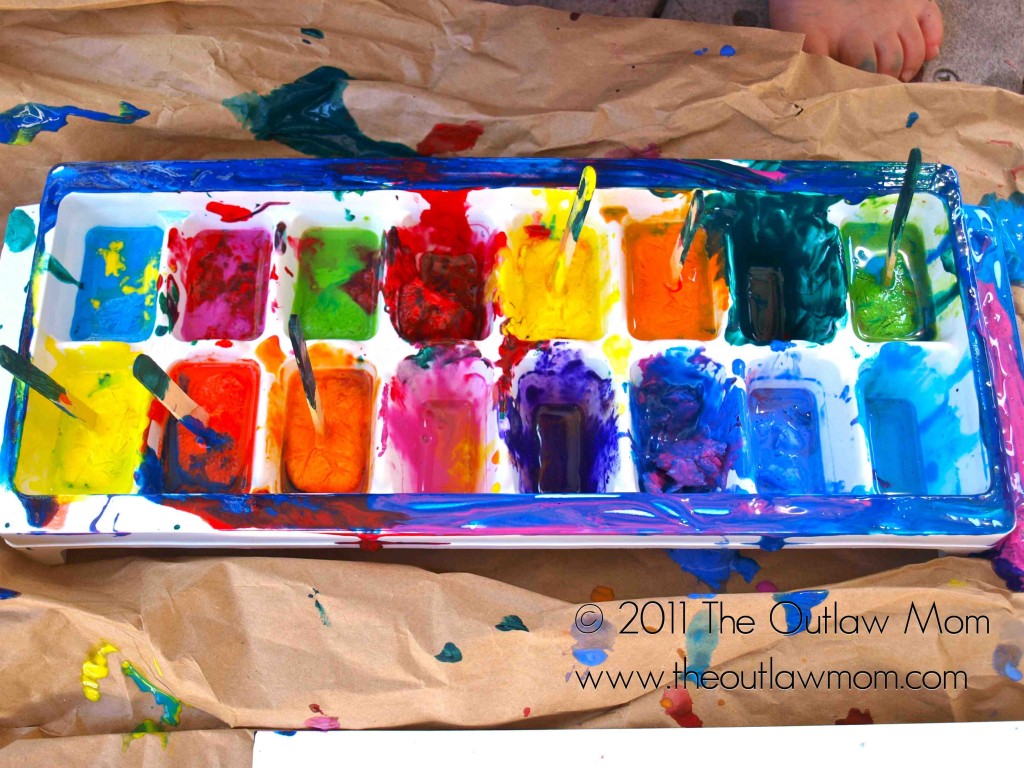
With all the squishy paint covering her hands, she came up with the idea of lacing her fingers and squeezing her palms together to make awesome paint fleck art. Of course, it all culminated in the ultimate sensory mess: fingerpainting.
 What a beautiful mess!

Happy Painting!
LEARN! Colors, manual dexterity, material manipulation, fine motor skills, texture, science (states of matter)















[…] Inspired By: 1. Red Ted Art 2. The Outlaw Mom 3. Maria Teorien Filed Under […]
[…] HERE for […]
Hi! I wanted to let you know that I loved this activity so much that I featured you on my new blog post “Winter art games!”.You can see it here: http://maros-kindergarten.blogspot.gr/2013/02/blog-post_16.html
I would love your feedback! Have a nice weekend!
Oh, thank you - I appreciate the love
I love this technique! It is so fun and “unusual”! I will definitely try it!
I am doing a summer bucket list post and am wondering if I can post one of these pics along with a link to your blog?
Sure, Jamie! Please go ahead - and thanks for asking!
[…] 4. Paint With Colorful Ice Cubes […]
Thanks for this post! I came over from a pinterest link and just love this idea. I’m going to try it with my boys this year. Being boys, anything that makes them messy and dirty makes them happy.
I love the learning aspect of this craft. It’s fun, easy to set up and so great for the kids.
Love it!
Thanks so much, Stephanie. You and your boys definitely have to try it. Don’t wear anything you don’t want to get paint on when you do it with them - you’ll be flecked with paint for sure, if they’re anything like my daughter Btw, your quilts are so cute.
I love this idea - we never got around to it in the summer so I’ve just pinned it to try when it’s a little warmer and we can get well and truely colourful in the garden. Stopping by from the best ideas for kids blog hop
Yep, this is probably better for summer, especially if you want to contain the mess. I guess if you did it with food coloring, you could do it in the bath?! Thanks for stopping by Cerys
[…] Colorful Ice Cube Painting […]
[…] Colorful Ice Cube Painting (painting with frozen paint cubes) […]
[…] time’s up too soon. Coloring and painting are great, too, but sometimes there’s a huge mess to clean up or they’re constantly wanting to show me what they’ve made. Cute and lovely, but […]
Fun-colorful- and acrylics! Love it. Thank you for linking up to The Sunday Showcase!
Thanks so much for hosting the party, Aimee!
what a great idea! I love ideas that incorporate hands-on learning on different levels simultaneously.
I know - don’t you just love the color and the mess! Well, I didn’t enjoy cleaning it up so much, but the look on my daughter’s face during the activity was priceless. Thanks for stopping by
What an awesome idea!! I love this and can’t wait to try, plus really beautiful pictures too. Found you though the Tutus & teaparties Pininterest Linky.
Glad you liked it and hope you get the chance to try it! It’s messy, but super fun. Thanks for coming by from the Pinterest Linky at Tutus & Teaparties … it’s always nice to be introduced to new blogs from parties…your blog background is really cool, btw
This looks like a fun new way to paint! I can’t wait to try it!
I’d love for you to link up at my party: http://tutusandteaparties.blogspot.com/2011/09/pinteresting-linky-party-5.html
Thanks for letting me know about the party, Lauren! Just linked up. Thanks for stopping by and glad I found your blog through your comment
Beautiful, bright colors! Great idea mixing the acrylic paints with water. Acrylic paint offers so many more colors sometimes then regular kid paint. Thanks for sharing on It’s Playtime.
The color was just amazing! I’m not sure whether my daughter or I loved it more (I know my husband isn’t happy there’s still trace of it on the deck). Thanks for hosting the party!
This is such a great idea! I’m going to try this with my crew on our next warm day. They’re going to love every bit of it!
I’d love to see how it goes! I guess it’s starting to become fall (despite my denial), but maybe you guys can bundle up