


{Bake} Stained Glass Cookies
January 31, 2012 in All Posts, Bake

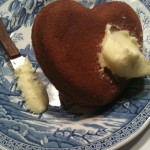
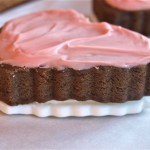
For How to Nest for Less’ Valentine’s Day Craft Series, I shared the recipe for our Stained Glass Heart Cookies on Erin’s blog. For archival purposes, I’m posting it here, too.

You can make these beautiful cookies out of any shape cookie cutter you have on hand, as long as you have the cutter in two different sizes. Come to think of it, using mismatched cutters would be cool as well! Or, you can simple use a sharp knife and trace any pattern your heart desires.

Read on for how to make these super simple, super fabulous cookies!
Ingredients

- 2 1/2 cups all-purpose flour
- 3/4 tsp salt
- 1 1/2 sticks (3/4 cup) unsalted butter, softened
- 3/4 cup sugar
- 1 large egg
- 1 tsp vanilla
- 6-8 oz Jolly Rancher hard candies (or substitute your favorite hard candy)
Equipment

- Large and small cookie cutters (or a sharp knife)
- Silpat baking pad (or parchment or waxed paper)
- Baking sheet
Recipe
(adapted from Gourmet’s recipe for Stained Glass Teardrops)
First, make your cookie dough.
- In a small bowl, whisk the salt and flour together.
- In a large bowl, beat the butter and sugar together at medium-high speed until pale and fluffy. Then, beat in the egg and vanilla.
- Add the flour mixture to the butter and sugar mixture and mix at low speed until just combined.
- Form the dough into 3 equal disks and individually wrap and chill the disks until firm (approximately 2 hours).
Then on to the fun part - making the stained glass windows!
Don’t worry about completely pulverizing the hard candies. The pieces will all melt together during the baking process. I experimented with larger chips and it worked just fine.
Working with one disk at a time, roll out your dough to about 1/8 inch thick. Be sure to flour your surface and rolling pin well. 
Don’t forget (like I did with my first batch) to use a Silpat pad, parchment paper, or waxed paper or it will be impossible to get the melted candy off of your baking sheet! If you’re using a knife to make your cutouts, make sure the edges are smooth or the color of the melted candies will bleed into any jagged edges.
 If you want an absolutely pristine look, make sure the candy stays within the cutout window. Otherwise, you’ll end up with tiny sprinkles of color on your cookie or the color may overflow. (Not necessarily a bad thing)!

 Bake these beauties at 350 until edges are just golden brown. Any longer and your cookies will be darker and harder and you risk burning the candy, which will also darken. Trust me.
Happy Baking!
![]()
Parents and friends: for more ideas, activities, and inspiration for #RaisingThinkingKids, click on an icon below to join us on Facebook, Pinterest, Google+ and Twitter.
Fellow bloggers: join me at Bloggy Law, where you’ll find Simple Tips for Bulletproofing Your Brand and Blog and I’ll help you navigate the social media legal landscape a little more smoothly.
Chrissy – who has written 426 posts on The Outlaw Mom® Blog - Creative Living in a Conventional World.


[…] finish off your LOVEly dinner, try these Stained Glass Cookies by The Outlaw Mom for both a Valentine’s Day activity and […]
[…] Creative website Tinkerlab rounded up Thirty Valentines Crafts for Kids. This one is my favourite. Far too pretty to eat though! Tutorial here by The Outlaw Mom. […]
I’ve found a recipe for these in my cookie book and am planning to try to make them with the kids today. They look great I hope mine turn out half as good.
[…] Stained-glass Cookies: So pretty!, The Outlaw Mom […]
[…] with ♥Learning to Sew with Hearts & Buttonsby At Home with AliCook with ♥Stained Glass Heart CookiesThe Outlaw Mom BlogDisplay with ♥Love Note Message Boardby The Golden GleamMake a donation of […]
Your cookies are BEAUTIFUL!!!! Picture perfect!
Oh, thank you so much, Suzanne - and thanks for visiting They’re so easy, try them!
OH i love this one too!! Will you link this up too?
Thanks! Sorry to have missed your party, but will come by to link up at the next ones!
JDaniel would love the blue hearts. Blue is his favorite color.
I kind of like that they’re not the traditional pink and red, too!
[…] {Bake} Stained Glass Cookies […]